Configure avatars
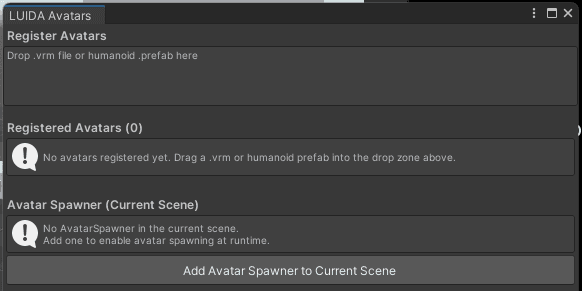
Drop a VRM or humanoid prefab into the LUIDA Avatars window to register it in the scene's AvatarRegistry, so AssignAvatarToParticipant can spawn it at runtime by ID.
These pages are not yet fully reviewed. The LUIDA team is continuing to review and improve them. If you find anything wrong on these pages, or have questions that aren't resolved by reading them, please ask or report to the LUIDA team.
LUIDA › Configure avatars is the editor-side companion to the runtime action AssignAvatarToParticipant(avatarID, participantIndex). It manages the current scene's AvatarRegistry — a table from Avatar ID to a generated wrapper prefab — so your state-listening items can spawn researcher-supplied avatars by string ID without hardcoding prefab references.
If your experiment doesn't swap participant avatars (most don't), you can skip this window entirely. If you're doing embodiment research, avatar manipulation studies, or any paired study where each participant should look different from their Cluster default, this is where you register the avatars you'll later assign at runtime.
What you register
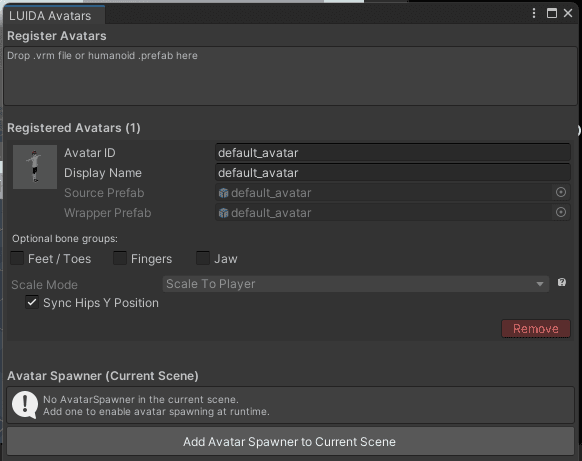
Each entry under Registered Avatars shows:
| Field | What it controls |
|---|---|
| Avatar ID | The name AssignAvatarToParticipant looks up, and what the action's dropdown lists. Defaults to the dropped file's name; editable. Case-sensitive — use a stable, code-friendly identifier (e.g., doctor_coat, not Doctor Coat #1). |
| Display Name | Label shown in the editor. Defaults to the file name; no runtime effect. |
| Source Prefab (read-only) | The .vrm asset or humanoid prefab you dropped. |
| Wrapper Prefab (read-only) | The CCK item LUIDA generated around the source. It carries AvatarSyncClone.js and the generated <Name>_BoneMap.js, which is what continuously syncs the wrapper's bones to the participant's avatar. |
| Optional bone groups (Feet / Toes, Fingers, Jaw) | Extra bone groups to sync. Off by default. |
| Scale Mode | How the wrapper is scaled relative to the participant. Default Scale To Player. |
| Sync Hips Y Position | Follow the participant's hips height (crouching, jumping). On by default. |
Remove deletes the entry. Toggling any sync option reveals a Rebuild button that regenerates the wrapper and bone map.
The registry belongs to the scene: each scene has its own AvatarRegistry, and a new scene starts empty.
How it interacts with the runtime
At session time:
- A state-listening item calls
AssignAvatarToParticipant("doctor_coat", 1). - The scene's
LUIDA-AvatarSpawneritem (runningAvatarManager.js) looks updoctor_coatin the AvatarRegistry, finds the generated wrapper prefab, and spawns it as a CCK item at participant 1's current world position. AvatarSyncClone.json the spawned wrapper reads participant 1's bone transforms each frame and applies them to the wrapper.- Other players in the room see the wrapper rendered over (or in place of) the participant's normal Cluster avatar.
For the visual swap to look clean, the experiment's Participant Avatar mode in the Web Console must be HIDE — otherwise the original Cluster avatar shows through. See Web Console → Creating an experiment → World & Platform.
Registering an avatar
- Open
LUIDA › Configure avatars. - Drop one of the following onto the Register Avatars zone at the top of the window:
- a
.vrmfile from outside the project — LUIDA copies and imports it (VRM 0.x and 1.0 both work; 0.x files are migrated to VRM 1.0 on import), - a
.vrmasset already in the Project window, or - any humanoid prefab, for example an FBX-based model (A-posed rigs are fine).
- a
- LUIDA generates the wrapper prefab and bone map, and a new entry appears under Registered Avatars with the Avatar ID set to the file name. Edit the ID if you want a different one; leave the other options at their defaults unless you have a reason.
- If the Avatar Spawner (Current Scene) section says there is no spawner, click Add Avatar Spawner to Current Scene (see below).
There is no Save button — the entry is written to the scene's registry immediately. The avatar is then callable from any state-listening item in this scene, and the Assign avatar to participant action offers it in a dropdown.
Always drop the source (.vrm or humanoid prefab), never the generated wrapper prefab. The wrapper bakes the source's rest pose into its bone map, which is what keeps non-normalized VRM 1.0 skeletons and A-posed FBX models animating correctly. After upgrading LUIDA, rebuild previously registered avatars so their bone maps gain the current data: toggle any sync option to reveal the Rebuild button, or re-drop the file.
Avatar Spawner
The bottom of the window shows whether the current scene contains a LUIDA-AvatarSpawner item. This item runs AvatarManager.js: it resolves participant numbers to players and spawns, syncs, and destroys the avatar wrappers. AssignAvatarToParticipant sends its request to this item, so without a spawner the action logs a warning and does nothing. Click Add Avatar Spawner to Current Scene once per scene; the shipped sample scenes already include one.
Where the registry is stored
The registry and everything generated for it live in a per-scene folder under Assets/_Experiment_/Avatars/. For the shipped ProteusSample scene:
Assets/_Experiment_/Avatars/ProteusSample/
  AvatarRegistry.asset   the registry this window edits
  Source/                the .vrm files you dropped
  Wrappers/              generated wrapper prefabs
  Generated/             generated <Name>_BoneMap.js files
Check the folder name LUIDA picks for your own scene the first time you register an avatar. Treat these files as managed by this window — edit only through the editor, not by hand.
When to use this window vs. the Web Console avatar settings
There are three avatar-related settings to keep straight:
| Where | What it does |
|---|---|
Web Console → Creating an experiment → Participant Avatar mode (HIDE / DEFAULT / UNRESTRICTED) | Project-wide policy for what avatar participants render with. See create-experiment. |
| Web Console → experiment → Avatars tab | (Deprecated per-world avatar set; most projects don't use this.) See Web Console → Avatars. |
This window (LUIDA › Configure avatars) | Per-scene registry of generated avatar wrappers that AssignAvatarToParticipant looks up. |
In short: the Web Console controls what the participant looks like by default; this window controls what you can swap them into at runtime.
Common pitfalls
avatarIDtypo.AssignAvatarToParticipant("doctorcoat", 1)silently no-ops if the registry has it asdoctor_coat. Case-sensitive, exact match.- Forgetting the Web Console mode. With
participantAvatarMode = UNRESTRICTED, the participant's Cluster avatar renders behind the LUIDA wrapper and you'll see double. Set toHIDE. - No
LUIDA-AvatarSpawnerin the scene. The assign action only logs a warning. Add one from the bottom of this window. - Per-scene registry. Registrations don't carry over to a new scene. If you copy a state-listening setup that calls
AssignAvatarToParticipant("foo", 1)into another scene (or project), registerfoothere as well.
Where to go next
- Tutorial 2 → Priming + Proteus Effect (with LUIDA automation) — hands-on walkthrough that registers two avatars in this window and assigns them per condition.
- Cookbook → Unique avatar per participant — short recipe-style summary.
AssignAvatarToParticipant(avatarID, participantIndex)— the runtime action that uses this registry.UnassignAvatarFromParticipant(participantIndex)— the cleanup counterpart; pair with assigns.- Web Console → Creating an experiment → Participant Avatar — the project-wide policy you need to set to
HIDE. - Web Console → Avatars — the (mostly deprecated) per-experiment VRM upload flow.
Configure experiment identifiers
The Unity window where you paste your eID, verify token, callExternal endpoint, and pNum. The same content lives at Setup → Connect to Web Console — see there for the full walkthrough.
Configure data collector
Configure what data your experiment saves and uploads each time it records.