Tutorial 2 — Proteus Effect (with LUIDA automation)
Rebuild the same Proteus Effect bridge-choice study as Tutorial 1 declaratively, using LUIDA's variables, state machine, and state-listening items.
| Time | ~75 min |
| Uses LUIDA automation? | Yes |
| Prereqs | Tutorial 0 — Hello LUIDA complete. Setup complete. |
| Concepts introduced | The full LUIDA automation surface: within-subjects variables (isRandom), state machine, state-listening items, per-row If conditional branching, Data Collector's Condition lookup source. Built entirely from the editor's predefined actions — no inline JS. |
| Starting asset | Assets/_Experiment_/Scenes/Sample/ProteusSample_practice.unity — the same scene scaffold as Tutorial 1 (a Mirror that functions as a mirror, an InstructionPanel backdrop plate, Bridges, SafeBridgeCheckPoint, DangerousBridgeCheckPoint, and a Portal prefab instance placed in the scene). State-listening items, variables, state machine, and Data Collector are not yet configured. (The scene also ships an unused ThankYouText; ignore or delete it.) |
| End state | Same as Tutorial 0. |
Experiment plan
The participant's experience breaks into a few phases.
| Phase | What happens |
|---|---|
| Intro (~5 s) | A welcome message appears and dismisses automatically |
| Trial (×2 repetitions) | ① An avatar is assigned and shown in the mirror (~10 s) ② The mirror disappears and two bridges become walkable ③ Cross either bridge ④ At the far end, an embodiment questionnaire appears ⑤ Submit to advance to the next trial |
| End | A portal and thank-you message appear, and the collected data is uploaded to the Web Console |
These phases are implemented using LUIDA's state feature. Set up one state per phase, and the runtime automatically advances to the next state once each transition condition is met (configured from step 5 onward).
The trial repeats twice, with elder and young each assigned once (order randomized).
Variables:
within-subjects:
  avatar: ["elder", "young"]   isRandom = true

(no between-subjects)
trialsCountPerCondition: 1
→ 2 trials per participant
Recorded per trial:
avatar—"elder"or"young".bridge—"safe"or"danger".
1. Register the experiment in the Web Console
Create the experiment
luida.cluster.mu → + New Experiment.
- Title:
Proteus Bridge Experiment - Room capacity:
1 - Status:
Testing
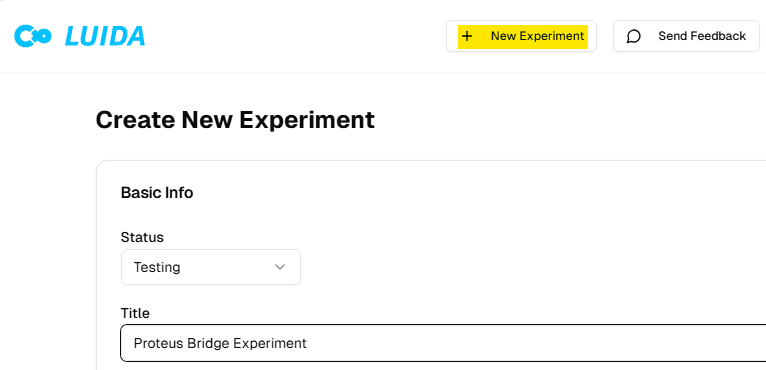
Keep Status as Testing throughout this tutorial. When you later create your own experiment and switch it to Public, it will be listed on LUIDA's recruitment world the next day and participants can join.
Set Participant Avatar to HIDE
Detail page → World & Platform → Participant Avatar = HIDE. Save.
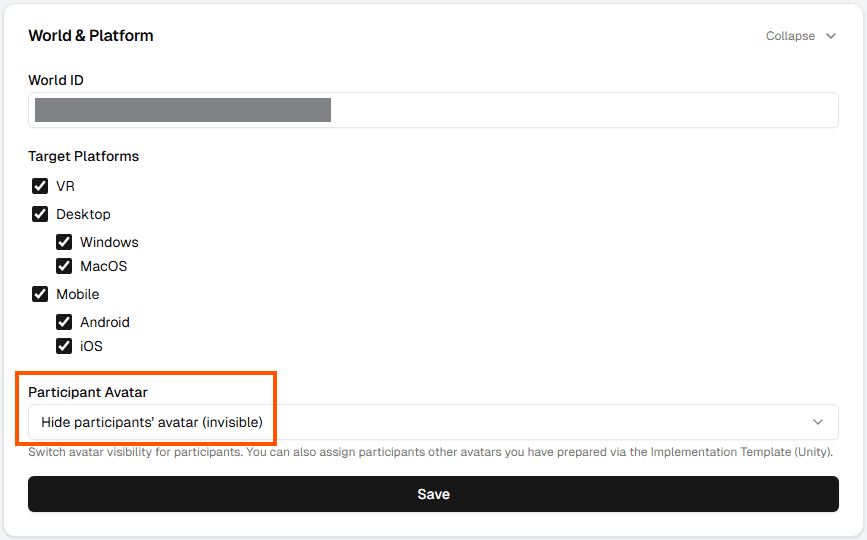
During the experiment, Unity assigns avatars to the participant based on the experimental condition, so we hide the participant's own Cluster avatar.
The HIDE setting takes effect the next day. Cluster's avatar restriction propagates only on the day after you change it. If you upload the world and test it yourself today, your own avatar will overlap with the Unity-assigned avatar — but you can ignore this during the tutorial test.
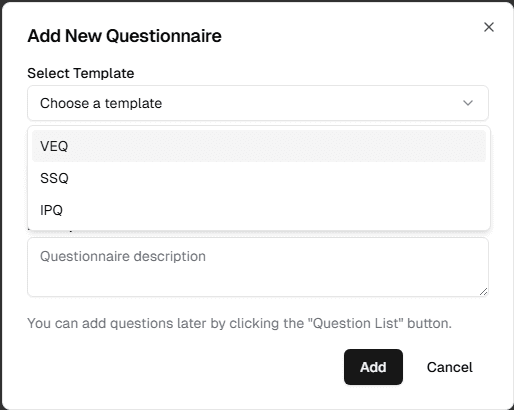
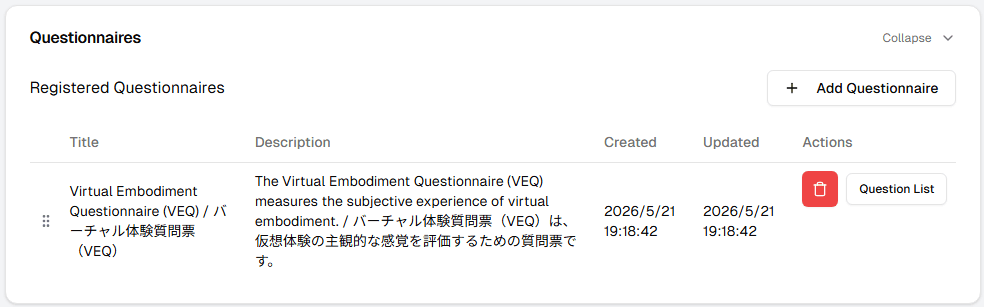
Add the VEQ template questionnaire
Scroll to Questionnaires → Add Questionnaire → Template Selection = VEQ. Click Add. The questionnaire is auto-populated with the standard VEQ items.

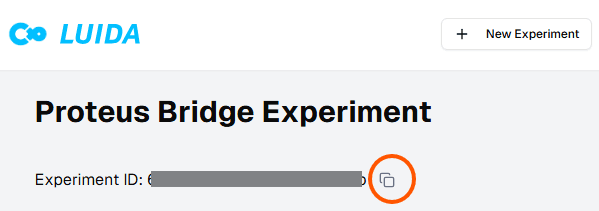
Copy the eID
Copy the eID from the experiment detail page — you'll paste it into Unity in step 2. The verify token is auto-managed on Cluster's side at Unity login; no copy needed.
2. Initial Unity setup
Duplicate the sample scene
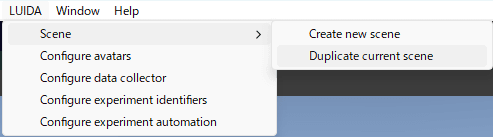
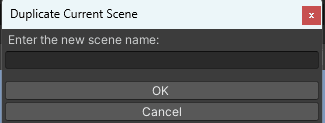
Open Assets/_Experiment_/Scenes/Sample/ProteusSample_practice.unity. Use LUIDA → Scene → Duplicate current scene to duplicate it under any name you like (e.g. tutorial_2).
Configure experiment identifiers
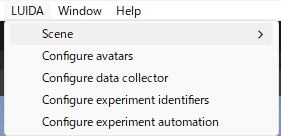
LUIDA → Configure experiment identifiers. Paste this experiment's eID into Experiment ID and set Number of Participants to 1.
3. Register the sample avatars
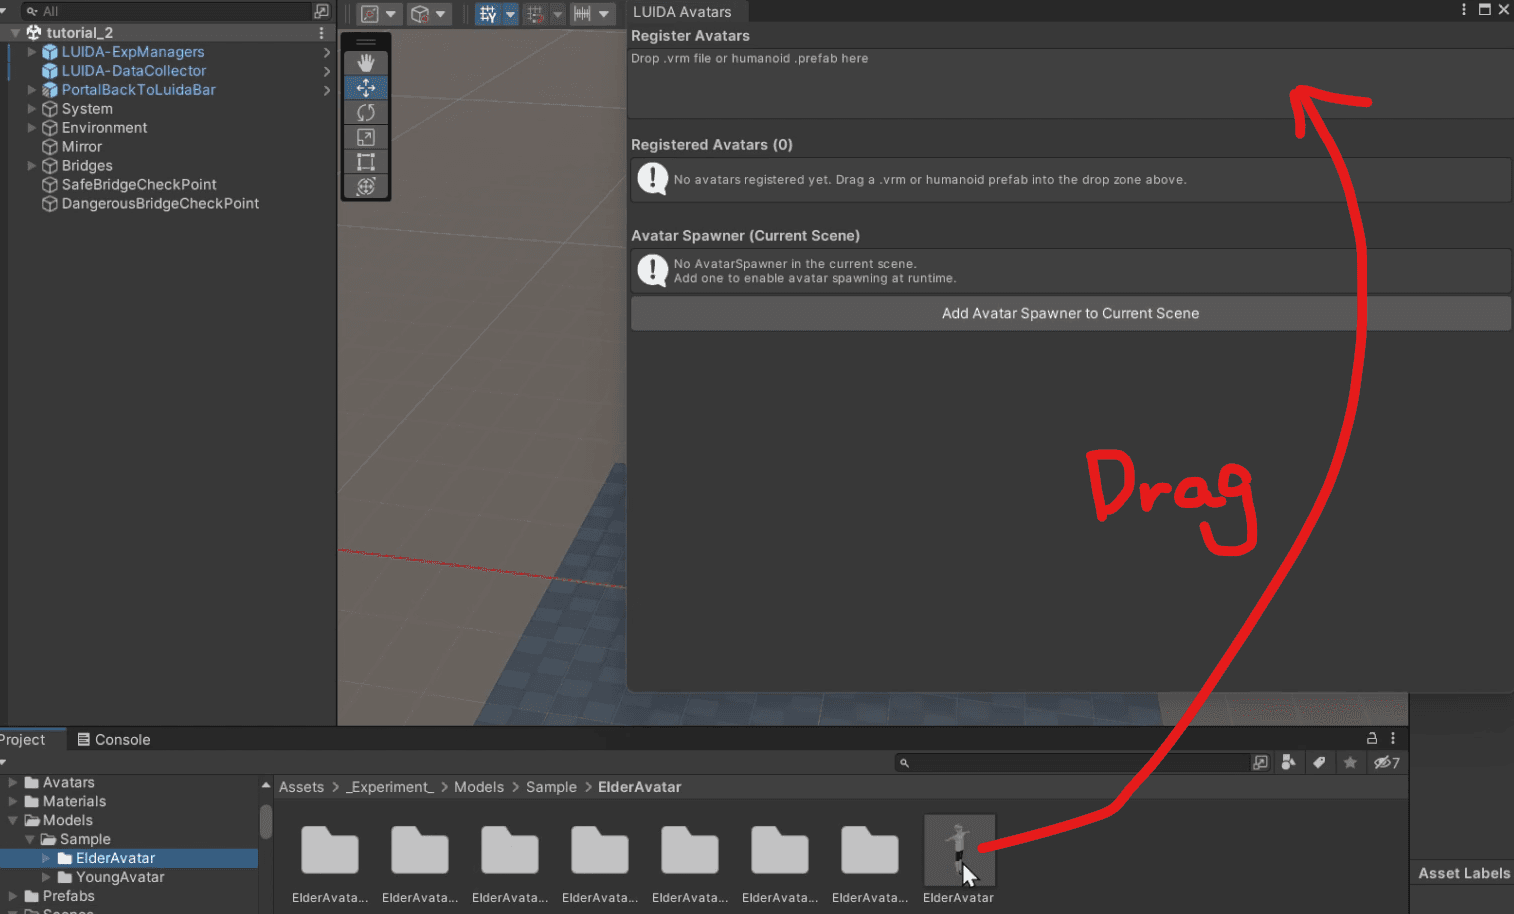
Sample avatar prefabs ship at Assets/_Experiment_/Models/Sample/ElderAvatar/ and Assets/_Experiment_/Models/Sample/YoungAvatar/. This tutorial uses them as-is — you don't need to bring your own VRMs.
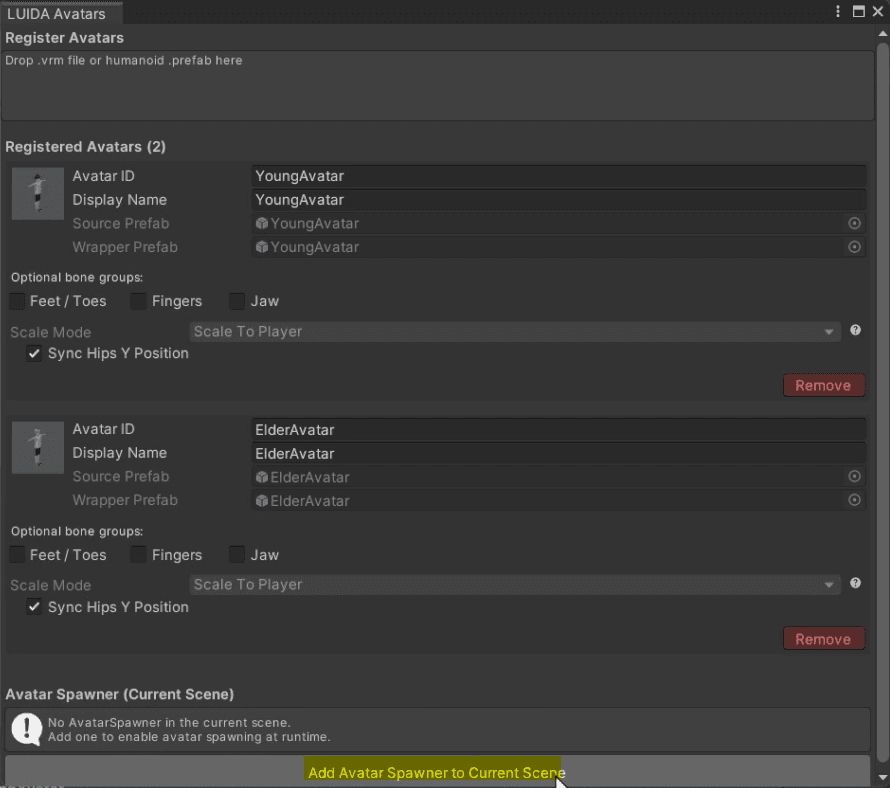
Open LUIDA → Configure avatars and drag each folder's .prefab into the Register Avatars slot as below. Leave the other fields at their defaults.
| Avatar ID | Avatar prefab |
|---|---|
elder | Assets/_Experiment_/Models/Sample/ElderAvatar/ElderAvatar.prefab |
young | Assets/_Experiment_/Models/Sample/YoungAvatar/YoungAvatar.prefab |
Save. Registration order is irrelevant — the Assign avatar to participant action looks up by avatarID at runtime.
If you swap in your own avatar, import an fbx file or a VRM 0 file into your Unity project before registering. LUIDA currently does not support VRM 1.0 — models exported as VRM 1.0 fail to load. When exporting from VRoid Studio or similar, choose VRM 0.0.
4. Declare the LUIDA variable + trial count
The variable values you declare in this tab become the candidate condition values for each trial. For example, declaring avatar: [elder, young] expands into 2 trials, with the avatar condition being either elder or young on each trial.
Open the automation editor
LUIDA → Configure experiment automation → Variables tab. The within-subjects variable you declared in the Web Console should appear automatically. If not, click Refresh from Web Console.
Configure avatar
In Variables for Within-Subject Conditions, confirm one row:
| Name | Values | isRandom |
|---|---|---|
avatar | elder, young | ✓ |
isRandom: true shuffles the trial order per participant — roughly half see elder first, the other half young first.
Leave Variables for Between-Subject Conditions empty.
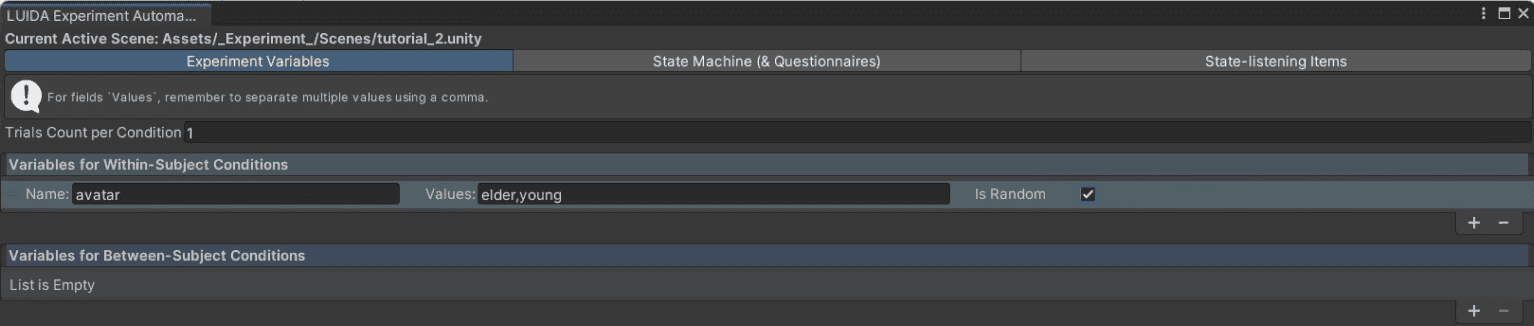
Set Trials Count per Condition = 1
The trial count is auto-computed: 2 unique conditions × 1 = 2 trials per participant.
5. Build the state machine
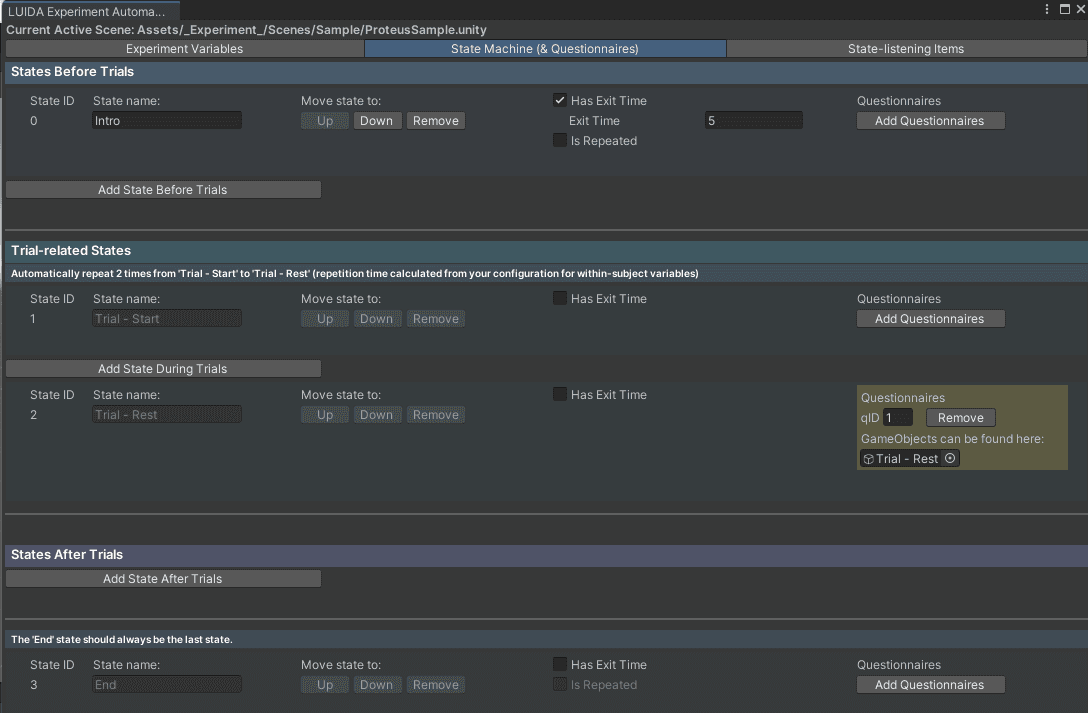
Here we lay out the phases from the "Experiment plan" as states.
Switch to the State Machine tab
Inside LUIDA → Configure experiment automation.
Add the states
| # | State name | Dest state | Has Exit Time | Exit Time (s) | qID | Notes |
|---|---|---|---|---|---|---|
| 1 | Intro | Trial - Start | ✓ | 5 | — | Auto-advances after 5 s (Has Exit Time on). Tick the box; type 5 into Exit Time. |
| 2 | Trial - Start | Trial - Rest | — | 0 | — | Per-item Sleep chains drive the Phase A → B → C timing. Bridge collision advances the state machine via the checkpoint's On collide event handler. |
| 3 | Trial - Rest | End | — | 0 | 1 | VEQ (qID = 1) appears immediately on entry; participant submit auto-advances. |
| 4 | End | (empty) | — | 0 | — | Teardown + upload + portal. |
Trial - Start and Trial - Rest form the trial loop, repeated unique conditions × trialsCountPerCondition times (here, 2 × 1 = 2) automatically.
6. Configure the Data Collector (Builder GUI)
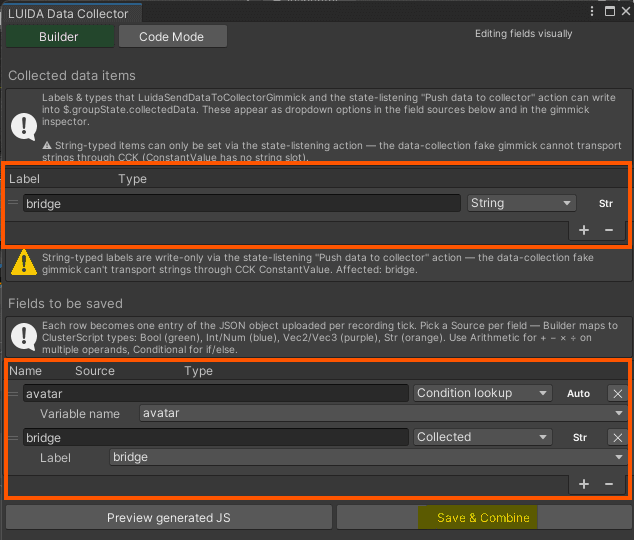
In Data Collector, you assemble the data uploaded to the Web Console per trial in two stages:
- Collected data items: Declare receiving slots (scratchpad) that scene actions write into. For example, the bridge checkpoints will write the
bridgevalue into the slot defined here. - Fields to be saved: Using the slots above plus condition values, assemble the actual row that gets uploaded.
Open LUIDA → Configure data collector from Unity's top menu.
Field 1: avatar
- Name:
avatar - Source:
Condition lookup(returns the current trial's condition variable value as-is) - Variable name:
avatar
Field 2: bridge
- Name:
bridge - Source:
Collected(reads the value written into a slot declared underCollected data items) - Label:
bridge
Save
Click Save & Combine.
From here through step 12, we define the behavior of GameObjects that react to state transitions (the experiment flow) — these are called state-listening items. For each item, we list what happens when it enters or leaves each state (show / hide / set text / collect data, etc.) as rows.
7. Wire AvatarController (state-listening item)
Create AvatarController from scratch in the state-listening items editor. This item gathers the avatar lifecycle and per-trial teleport rows.
Open the State-listening Items tab and create AvatarController
LUIDA → Configure experiment automation → State-listening Items. In the New Item Name field at the top, type AvatarController and click Create New Listening Item. LUIDA creates a new GameObject named AvatarController at the scene root with the Luida State Listening Item component already attached, and adds a column for it to the grid.
Add the rows
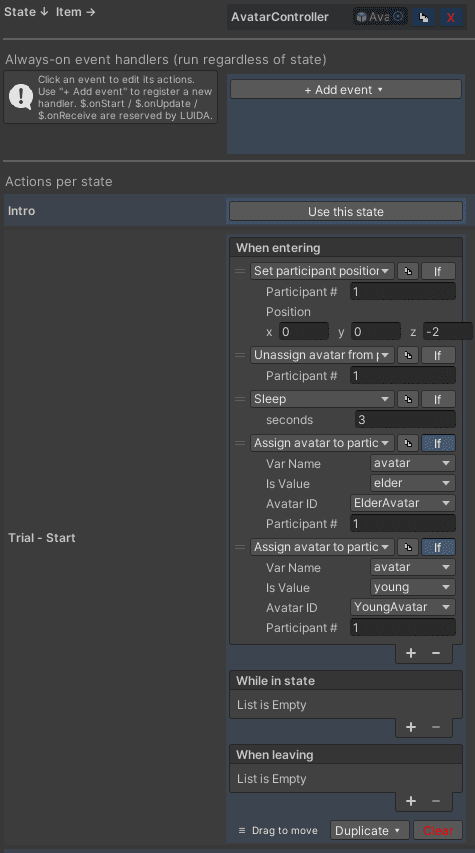
Add each row from top to bottom in each table (same convention for the following sections). For Assign avatar to participant rows, use the If toggle (only visible on trial-related states): tick it, set Var Name = avatar, then pick Is Value per the table below.
Trial - Start / When entering
| Action | Fields | Purpose |
|---|---|---|
| Participant transform / Set participant position | Participant # = 1, x = 0, y = 0, z = -2 | Snap the participant back to the spawn area at the start of each trial |
| Avatar / Unassign avatar from participant | Participant # = 1 | Defensively clear the previous trial's avatar |
| State machine / Sleep | seconds = 3 | Phase A: wait 3 s (sync'd with Instruction's "Preparing trial...") |
Avatar / Assign avatar to participant — tick If, Var Name = avatar, Is Value = elder | Avatar ID = elder, Participant # = 1 | Assign the elder avatar only when this trial's condition is elder |
Avatar / Assign avatar to participant — tick If, Var Name = avatar, Is Value = young | Avatar ID = young, Participant # = 1 | Assign the young avatar only when this trial's condition is young |
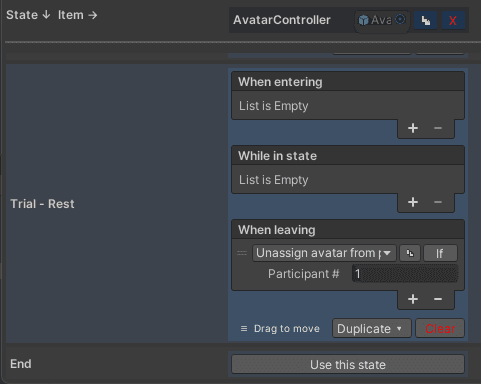
Trial - Rest / When leaving
| Action | Fields | Purpose |
|---|---|---|
| Avatar / Unassign avatar from participant | Participant # = 1 | Unassign the avatar after questionnaire submit |
8. Wire Instruction
Create Instruction from the state-listening items editor. The scene already has a background plate called InstructionPanel; we make it a child of Instruction.
Create Instruction as a state-listening item
LUIDA → Configure experiment automation → State-listening Items. Type Instruction into New Item Name and click Create New Listening Item.
Add the rows
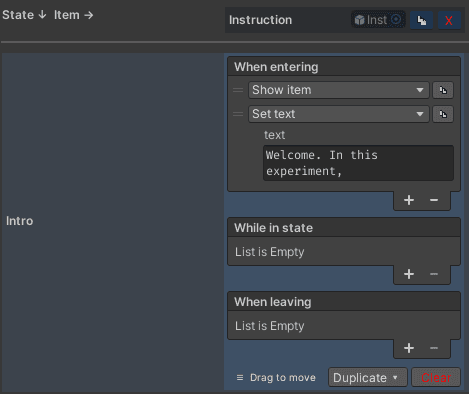
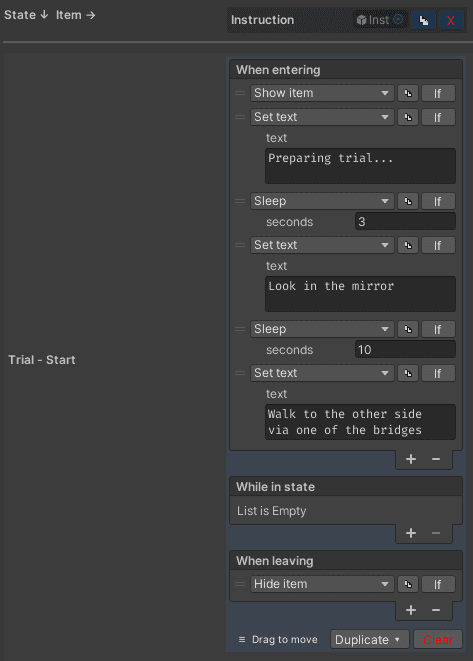
Intro / When entering
| Action | Fields | Purpose |
|---|---|---|
| Item / Show item | — | Show the Instruction panel |
| Item / Set text | text = Welcome. The first trial will begin shortly. | Display the welcome message |
Trial - Start / When entering
| Action | Fields | Purpose |
|---|---|---|
| Item / Show item | — | Re-show the panel that was hidden in Trial - Rest |
| Item / Set text | text = Preparing trial... | Phase A: show the preparing message |
| State machine / Sleep | seconds = 3 | Wait Phase A's 3 s |
| Item / Set text | text = Look in the mirror | Phase B: switch to the mirror prompt |
| State machine / Sleep | seconds = 10 | Wait Phase B's 10 s |
| Item / Set text | text = Walk to the other side via one of the bridges | Phase C: switch to the bridge-crossing prompt |
Trial - Rest / When entering
| Action | Fields | Purpose |
|---|---|---|
| Item / Hide item | — | Hide Instruction while the questionnaire is up |
Make InstructionPanel a child of Instruction
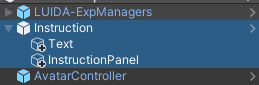
In the Hierarchy, drag the existing InstructionPanel GameObject onto Instruction so it becomes a child. The local Transform can stay as it is.
Align the auto-spawned Text over InstructionPanel
The moment you added the first Set text row in the previous step, LUIDA auto-spawned a Text GameObject as a child of Instruction. Adjust its local position so the message lines up flush against InstructionPanel (a small z offset toward the camera avoids z-fighting with the panel). Tweak the local scale or TextView font size as needed so the message fits inside the panel.

9. Wire Mirror
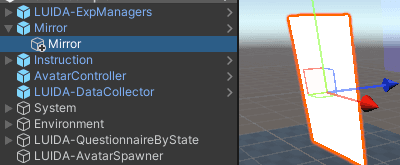
The scene has a GameObject called Mirror that functions as a mirror. In the state-listening items editor, create a new Mirror, then make the existing Mirror its child.
Create Mirror as a state-listening item
LUIDA → Configure experiment automation → State-listening Items. Type Mirror into New Item Name and click Create New Listening Item. Because the scene root already has a Mirror, Unity temporarily appends a suffix (e.g. Mirror (1)) — that's fine, we'll make the existing one a child and rename in the next step.
Add the rows
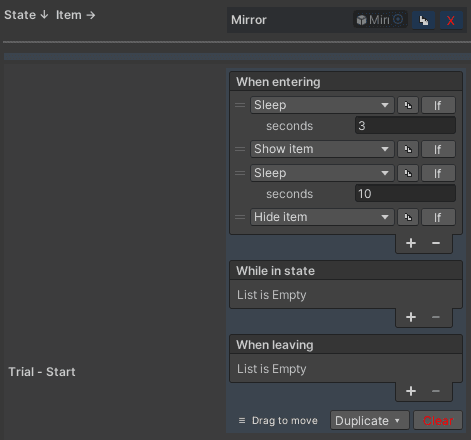
Trial - Start / When entering
| Action | Fields | Purpose |
|---|---|---|
| State machine / Sleep | seconds = 3 | Wait Phase A's 3 s (Mirror still hidden) |
| Item / Show item | — | Phase B begins: show the Mirror |
| State machine / Sleep | seconds = 10 | Wait Phase B's 10 s |
| Item / Hide item | — | Phase C begins: hide the Mirror so the participant focuses on the bridges |
Make the existing scene Mirror a child of the new item
In the Hierarchy, drag the existing scene Mirror onto the new item so it becomes a child, then rename the new item back to Mirror.
10. Wire Bridges and the bridge checkpoints
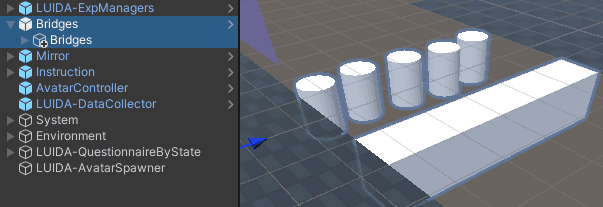
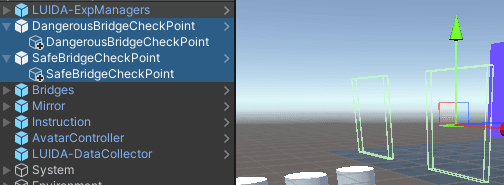
The scene contains Bridges (both bridge meshes combined into a single GameObject), SafeBridgeCheckPoint at (1.5, 1, 8), and DangerousBridgeCheckPoint at (-1.5, 1, 8) — checkpoint cubes placed at the far end of each bridge. For each, create a same-named state-listening item and move the existing scene object inside as a child.
Create Bridges as a state-listening item
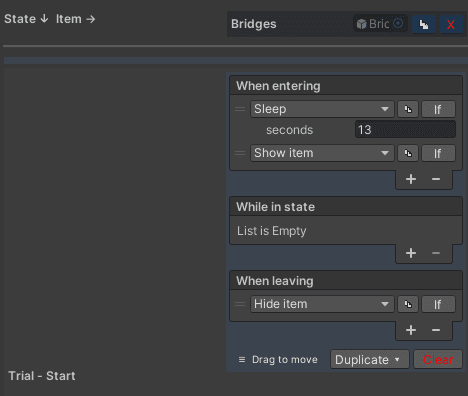
State-listening Items → New Item Name: Bridges → Create New Listening Item. In the Hierarchy, drag the existing scene Bridges onto the new item so it becomes a child, then rename the new item back to Bridges.
Add the rows.
Trial - Start
| Hook | Action | Fields | Purpose |
|---|---|---|---|
| When entering | State machine / Sleep | seconds = 13 | Wait Phase A + Phase B combined 13 s (Bridges still hidden) |
| When entering | Item / Show item | — | Phase C begins: make the bridges walkable |
| When leaving | Item / Hide item | — | Hide the bridges the moment the crossing fires To next state |
Create DangerousBridgeCheckPoint as a state-listening item
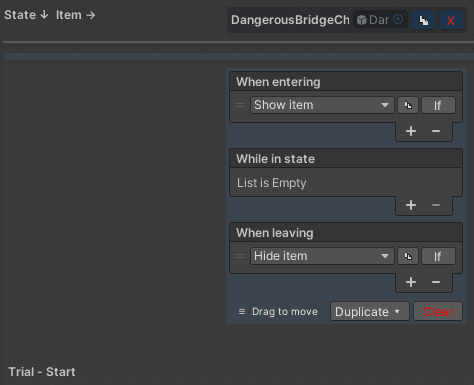
State-listening Items → New Item Name: DangerousBridgeCheckPoint → Create New Listening Item. In the Hierarchy, drag the existing scene DangerousBridgeCheckPoint onto the new item so it becomes a child, then rename the new item back to DangerousBridgeCheckPoint. Add the per-state rows.
Trial - Start
| Hook | Action | Fields | Purpose |
|---|---|---|---|
| When entering | Item / Show item | — | Show the checkpoint cube (same timing as the bridges) |
| When leaving | Item / Hide item | — | Hide the checkpoint cube (same timing as the bridges) |
Add a Rigidbody to DangerousBridgeCheckPoint
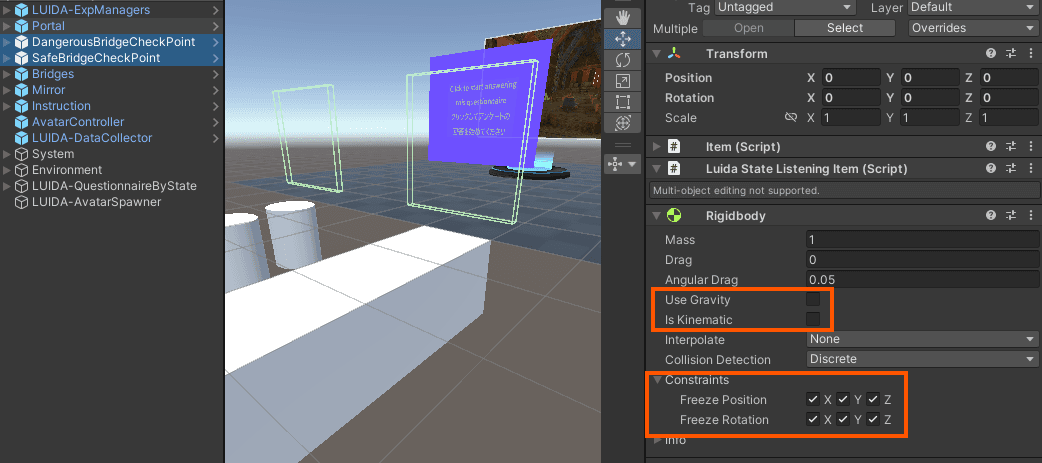
The On collide event handler in the next step requires a Rigidbody on the state-listening item. In the Hierarchy, select the newly-created DangerousBridgeCheckPoint (not the child checkpoint cube). In the Inspector, click Add Component → Physics → Rigidbody and configure it like this:
| Field | Value |
|---|---|
| Use Gravity | unchecked |
| Is Kinematic | unchecked |
| Constraints / Freeze Position | X, Y, Z all checked |
| Constraints / Freeze Rotation | X, Y, Z all checked |
You'll repeat this same Rigidbody setup on SafeBridgeCheckPoint later.
DangerousBridgeCheckPoint: add an On collide event handler
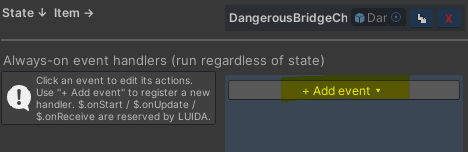
In the same state-listening item cell for DangerousBridgeCheckPoint, find the Always-on event handlers row. Click + Add event ▾ and pick On collide from the dropdown. Add three rows.
| Action | Fields | Purpose |
|---|---|---|
| Data collection / Push data to collector | label = bridge, type = String, value = 'danger' (single-quoted — the value field is a JS expression) | Write the chosen bridge type into the bridge slot |
| Data collection / Save pushed data to buffer | — | Snapshot the current bridge value plus the active condition values as one row into the upload buffer |
| State machine / To next state | — | Advance the state machine to Trial - Rest |
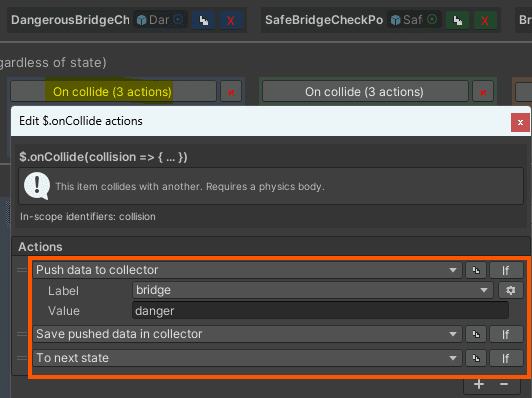
Close the popup.
SafeBridgeCheckPoint: same shape with safe
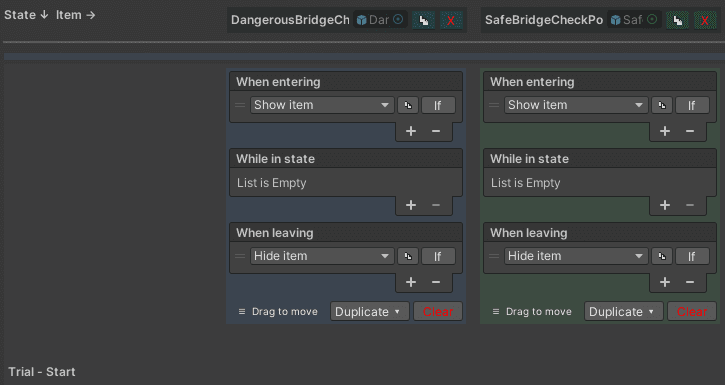
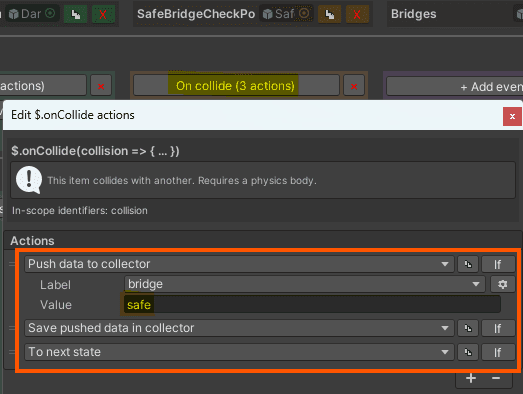
Repeat the previous three steps for SafeBridgeCheckPoint: create the same-named state-listening item, make the existing checkpoint cube its child, add the same Trial - Start Show / Hide rows, add the same Rigidbody to the new item, and add the same On collide event handler — but set row 1's value to 'safe'.
11. Wire Portal
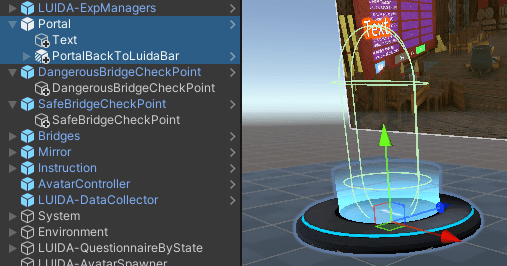
The scene has Portal — an instance of the WorldGateToLuidaBar prefab at (0, 0, 0.5). Create a same-named state-listening item, place the existing scene Portal inside as a child, and load the End-state work onto it. The scene's ThankYouText is not used here — ignore or delete it.
Create a new Portal and make the existing Portal its child
State-listening Items → New Item Name: Portal → Create New Listening Item. In the Hierarchy, drag the existing scene Portal (the WorldGateToLuidaBar prefab instance) onto the new item so it becomes a child, then rename the new item back to Portal.
Add the rows
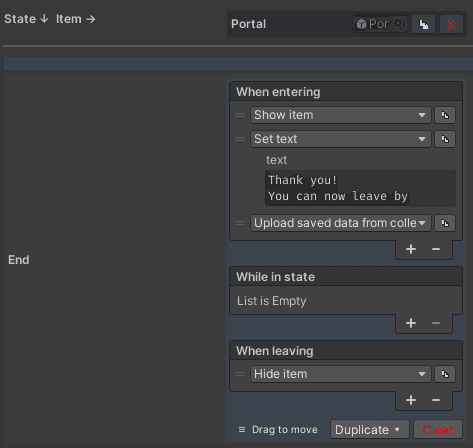
End / When entering
| Action | Fields | Purpose |
|---|---|---|
| Item / Show item | — | Show the Portal |
| Item / Set text | text = Thank you. Please step onto the portal to finish. | Display the thank-you message |
| Data collection / Upload collected data | — | Upload all buffered rows to the Web Console |
Add Upload collected data to exactly one item. Putting it on two items would trigger duplicate row uploads.
12. Test in Unity editor
Play through the full sequence
Press the ▶️ (Play) button. You should see:
Intro(5 s) — Instruction readsWelcome. The first trial will begin shortly.; Mirror, Bridges, Portal all hidden; no avatar assigned. After 5 s the state machine auto-advances.Trial - StartPhase A (3 s) — Instruction readsPreparing trial.... Mirror and bridges hidden. No avatar.Trial - StartPhase B (10 s) — one ofelder/youngis assigned (per-participant random); mirror appears; instruction readsLook in the mirror.Trial - StartPhase C — mirror hides; bridges appear; instruction readsWalk to the other side via one of the bridges. Walk onto either bridge.- State advances to
Trial - Rest. The VEQ (qID = 1) appears immediately and you submit it. The avatar is unassigned; the next iteration teleports you back to spawn. - Back to
Trial - Startfor the other avatar; same Phase A/B/C; cross either bridge; submit the second VEQ. End—Portalactivates with a thank-you message. Unity Console shows one[CSEmulator] callExternal type=uploadCustomData ... → 200line for the two-row payload.
Web Console → Data tab: two custom-data rows, one per trial, each with avatar and bridge populated. Plus two VEQ submissions stored against qID = 1.
Force the alternate order
To lock the order for repeatable testing, go to Configure experiment automation → Variables and uncheck isRandom on the within-subjects variable avatar. Trials will then run in the order written in the Values field. Re-tick isRandom after testing. See Concepts → Conditions, sessions, participants → Debug overrides for more detail.
13. Upload to Cluster and test on it
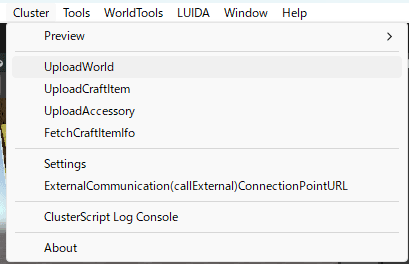
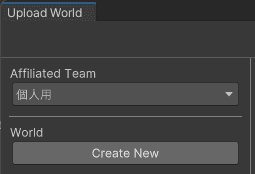
- Top menu's
Cluster > UploadWorld - Press the Create World button
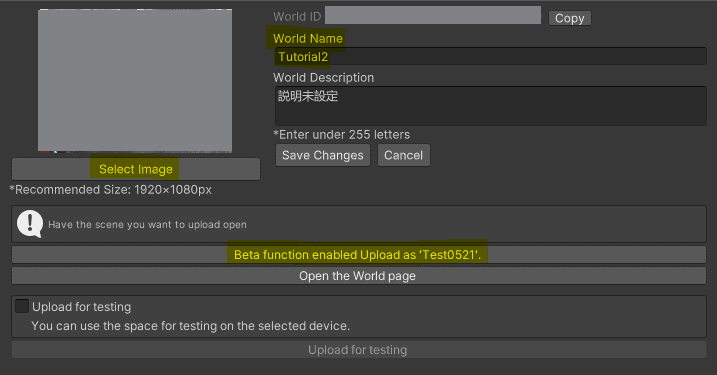
- Fill in a title, select an image, and press the Beta function enabled Upload as ... button
- Navigate to https://cluster.mu/account/contents/worlds to find the world you just uploaded.
- Don't make the world public yet! Keep it private; join the world yourself to verify everything works.
14. Verify data on the Web Console
After playing through the uploaded world, open the experiment detail page on luida.cluster.mu and confirm both data sinks received the session:
- Custom data tab — two rows for the session (one per trial) carrying
avatarandbridge. Each ofelder/youngappears exactly once. - Questionnaire responses tab — two VEQ submissions stored against
qID = 1.
If either tab is empty or fields are blank, see the matching entry in Common issues.
15. Register the World ID
In Cluster → My Content → Worlds → copy the UUID from the world URL. Paste into the Web Console's World ID field. Save.
A few final reminders:
- Avatar overlap during your Cluster test is normal. The
Participant Avatar = HIDEsetting on Cluster only takes effect the next day, so today your own Cluster avatar overlaps with the Unity-assigned avatar. It resolves automatically the next day. - Keep this tutorial world private on Cluster. It's only for verifying behavior — no need to publish.
- When you eventually publish your own experiment, switch the Web Console's Status to
Public. The next day, your experiment world will be listed on LUIDA's recruitment world and participants will be able to join.
What you just learned
- The trial loop runs just by declaring variables: Declare the value that varies between trials as a variable, and the state machine automatically iterates the trial the right number of times. Adding more conditions doesn't change the scene structure — you don't manually unroll trials.
- Build the experiment flow in states: Lay out phases like "Intro → Trial → Rest → End" as states, decide each transition's trigger, and the flow is done.
- Scene-side behavior is rows in a "state × item" grid: Each GameObject lists, per state and hook, what should happen as rows. Even per-trial branching is expressed at the row level via the If toggle instead of writing
ifin code — so JS knowledge is barely needed. - Declare the saved-data shape with Data Collector: Separating "scratchpad slots that scene actions fill" from "columns in the final saved row" keeps the data-collection flow easy to follow.
- No CCK triggers or gimmicks needed: Even state-independent events (like collisions) become state-listening items' "always-on event handlers." The whole scene's behavior is configurable entirely from LUIDA's editor.
Common issues
For anything else, email luida@cluster.mu.
What's next
- Reference → Actions for the full inventory of state-listening actions.
- Concepts → Conditions, sessions, participants for the balancer and per-trial condition resolution.