Configure data collector
Configure what data your experiment saves and uploads each time it records.
These pages are not yet fully reviewed. The LUIDA team is continuing to review and improve them. If you find anything wrong on these pages, or have questions that aren't resolved by reading them, please ask or report to the LUIDA team.
Configure data collector is where you choose what data your experiment saves and uploads every time it records. You set this up visually. For most experiments, you never write any code.
Open it from the Unity menu: LUIDA › Configure data collector. It only works on an experiment scene (a scene under Assets/_Experiment_/Scenes/).
Before you start: add a Data Collector
The window needs a Data Collector object in your scene. If there isn't one yet, the window shows a single button (Create LUIDA-DataCollector in this scene) and nothing else. Click it (or use the menu GameObject › LUIDA › Data Collector).
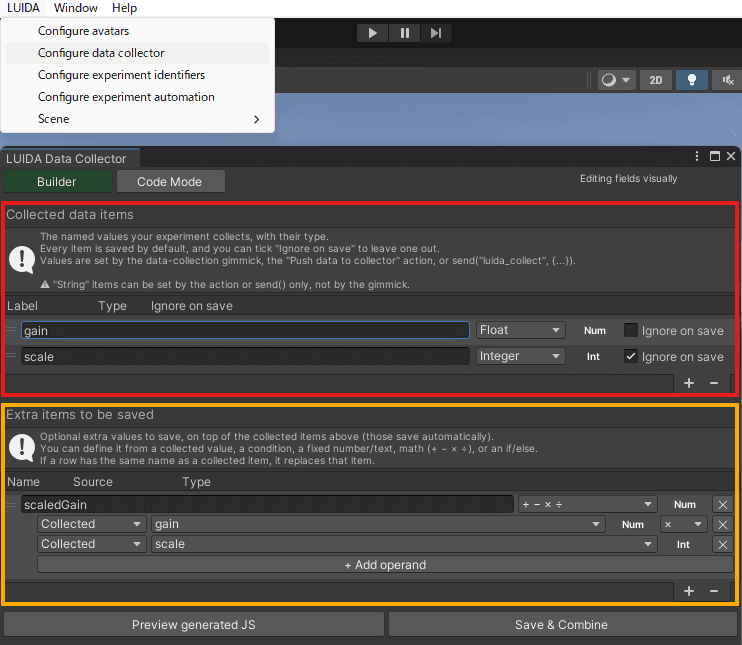
The window is built around two lists: Collected items (the values you measure, saved automatically) and Extra items (optional values you build from them). Together they decide the single record that is saved each time your experiment records.
Collected items (the red block in Fig. 1)
"Collected data items" is the list of values your experiment measures. Each row has a name and a type (Bool, Float, Integer, Vector2, Vector3, or String).
Every collected item is saved automatically. If you want to measure a value but keep it out of the saved data, tick Ignore on save. It is still collected, and you can still use it to build an Extra item.
A value can be set in three ways:
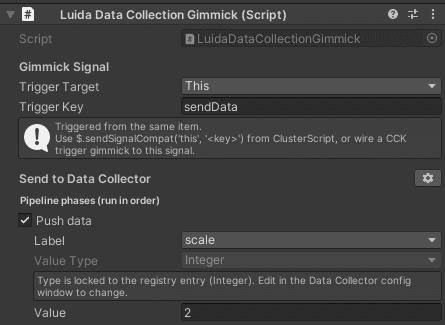
1. The Push data option on the scene's data-collection gimmick (Luida Data Collection Gimmick)
2. The Push data to collector action on a State-listening item (LUIDA automation feature)

3. Send data directly to the Data Collector from your own ClusterScript
Reference the DataCollector with worldItemReference, then use send to send object-type data under the key luida_collect:
const collector = $.worldItemReference("collector");
...
collector.send("luida_collect", { label: "value" });
Extra items (optional; the orange block in Fig. 1)
"Extra items to be saved" are optional values you build on top of the collected items, for example a total, an accuracy score, or a "fast / slow" label. They are saved in addition to the collected items, unless an extra item has the same name as a collected item, in which case it replaces it.
Each row has a name and a Source that decides where its value comes from:
- Collected: the value of one of your collected items.
- Global state read: a value read from the scene's global state (you give a key and a type).
- Condition lookup: which experiment condition was active (the current
CONDITIONvalue). - Direct value: a fixed number, text, or true/false, or a small piece of JavaScript.
- + − × ÷: the result of simple math across several values.
- if ... else ...: one of two values, chosen by comparing two things.
Builder and Code mode
A toggle at the top of the window chooses how you build the saved record:
- Builder (default): build it visually with the two lists above. This is right for almost every experiment.
- Code mode: write the saved record yourself in JavaScript. Use this only when you need something the Builder can't do (loops, custom shapes, or calling your own scene scripts).
- The record's value is defined by calculation using the collected items you defined first (
COLLECTED_DATAin the code) and/or experiment conditions (CONDITIONin the code), just as the example code block below.
- The record's value is defined by calculation using the collected items you defined first (
const timer = COLLECTED_DATA["timer"];
const isCorrect = COLLECTED_DATA["chosen"] === CONDITION["answer"];
return {
  time: timer,
  correct: isCorrect,
};
When does it record?
This window only decides what gets saved. When it records is controlled elsewhere, through three steps that always run in order:
- Push data: store a value.
- Save pushed data: build one record from the current values (this runs your
saveData()). - Upload saved data: send the saved records to the Web Console.
You can drive these three steps with the data-collection gimmick's phase toggles, with the matching actions (Push data to collector, Save pushed data in collector, Upload saved data from collector), or from a script. A script can also pass __record: true and __upload: true inside send("luida_collect", { ... }) to save and upload in the same message.
Common pitfalls
- Editing the generated
.jsby hand. Your changes are lost on the next save. Use Code mode instead. - Trying to send text through the gimmick. A String value can't go through the gimmick. Use the Push data to collector action or
send(). - Invalid names. Names with spaces or punctuation, or starting with a digit, are rejected. Fix the warning shown in the list.
- No Data Collector in the scene. Without one, the window shows only the Create LUIDA-DataCollector in this scene button, and nothing is recorded. Add it first.
Where to go next
GameObject › LUIDA › Data Collector: add the Data Collector object to your scene.- Push data to collector: the action that stores a value.
- Save pushed data in collector: the action that builds one record.
- Upload saved data from collector: the action that sends records to the Web Console.
- Concepts → Data collection: how the whole save-and-upload cycle works.
- Reference → Variables →
COLLECTED_DATA: the values you can read while building a record.