Setup
From a clean machine to a Unity editor that opens the LUIDA Implementation Template without errors, plus the steps to wire it to a Web Console experiment.
Get your tools ready, download the template, optionally install CSEmulator, then (if you already have an experiment registered) connect to the Web Console.
Before you start
You need these in place. None take more than a few minutes, except the Web Console waitlist, which is human-approved.
LUIDA Web Console account (approved off the waitlist)
Sign in at luida.cluster.mu/experiments; the first sign-in lands you on a waitlist page. Submit the request. Approval typically takes 1–3 business days. If you haven't heard back after several days, email the LUIDA team at luida@cluster.mu.
Unity Hub + Unity 6000.2.6f2
Install Unity Hub and Unity 6000.2.6f2. Add all four build-support modules, regardless of which OS you're developing on: Windows Build Support (IL2CPP), Mac Build Support (Mono), iOS Build Support, and Android Build Support.
Cluster account (free)
Register at cluster.mu. One account works on web, desktop, VR headsets, and mobile.
Cluster Creator Kit awareness
Skim CCK overview and Triggers & Gimmicks.
Setup steps
Download the template
Grab the latest release ZIP from github.com/cluster-lab/project-luida-bar/releases. Download the Source code (zip) asset of the most recent stable release.
Direct git clone the template repository is not recommended. The release ZIP
is the supported way to start.
Unzip somewhere sensible (e.g., ~/Documents/Unity/<your-project-name>/). Avoid Dropbox/iCloud-synced folders (Unity's compile cache fights the syncer). The unzipped folder is fine to track with your own Git repository.
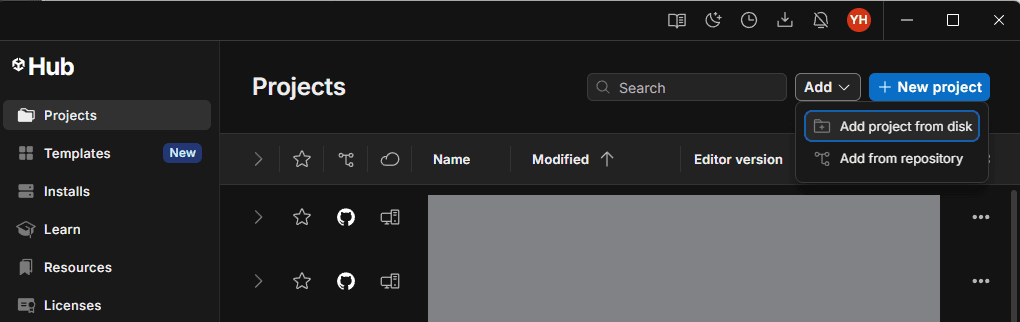
Open the folder in Unity Hub → Add > Add project from disk. Unity loads the project and imports assets; the first import takes a few minutes.
Install CSEmulator (optional)
This step is optional. You test LUIDA scenes by uploading them to a private Cluster test space (Japanese walkthrough). That always works, with nothing extra installed. CSEmulator is a speed-up: with it installed, you can additionally run a whole session by pressing Play in the Unity editor.
CSEmulator is a free KaomoLab plug-in on Booth.pm. A free Booth account is required (email or Pixiv/Twitter login).
Get it from vkao.booth.pm/items/7484814 and follow the installation instructions on that Booth page.
A friendly reminder: CSEmulator is a third-party tool, and the LUIDA team doesn't handle issues with installing or using it. If you import it, please do so at your own responsibility.
Log in to Cluster from Unity
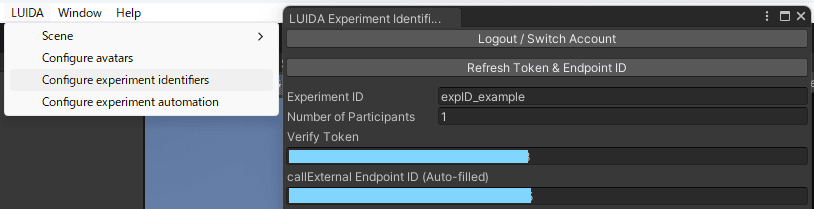
Opening LUIDA → Configure experiment identifiers from the top menu for the first time shows a login prompt ("Please log in with your Cluster access token to auto-fill API keys.").

- Click Create Access Token. Unity opens cluster.mu/account/tokens in your browser.
- Sign in with your Cluster account and issue a new access token. Copy it.
- Back in Unity, paste the token into the Access Token field and click Login.
The window then switches to the post-login form. To switch Cluster accounts, click Logout / Switch Account.
Connect to your Web Console experiment
This step is optional during setup. The tutorials walk you through it with
their own experiments. Push through now only if you're starting your own
experiment immediately. In that case, register the experiment on the Web
Console first (you need an eID). See Create an
experiment.
A LUIDA Unity project is generic: the same template can power many experiments. To bind a specific scene to a specific Web Console experiment, open LUIDA → Configure experiment identifiers and fill the two editable fields:
Experiment ID: paste the experiment'seIDfrom its detail page on luida.cluster.mu.pNum: required participants per session. Default1for solo studies; set to2for paired, etc.
The rest is managed for you.
Smoke-test the connection
Click Play in Unity, and check the Console for any errors.
Where to next
- New to LUIDA? Go through Tutorial 0: Hello LUIDA, an end-to-end ride-along of around 15 minutes that uses the project you just set up.
- Already have an experiment registered? Head to Components → Unity Template for the field-by-field reference of every LUIDA editor window.